Last Updated on November 23, 2022 by Bestusefultips
A screenshot is a snapshot that we take for different purposes. We use screenshots for preparing presentations, attachments, or sharing. It is also called a screen-cap or a screen grab. We can take or capture an entire area or an active Window using built-in programs or third-party software. There are several ways to take a screenshot on Windows 10 computer screen or display. We will guide you on how to take screenshots Windows 10 devices step by step.
Read Also:
How to Screenshot on PC Windows 10 Using Keyboard
In Windows 10, you can take a screenshot of the entire screen using the PrtScn key on a keyboard. PrtScn is a print screen key. The key is mainly found in the upper right corner of the keyboard. You have to paste the taken screenshot into any program which supports you. You can paste it into Paint, Word Document, and Presentation file. You can use the Windows key + PrtScn Key to simultaneously take the screenshot, which automatically saves your screenshot to the picture folder. We do not need to paste or save the screenshot manually.
How to Screenshot Using Snip & Sketch App
Step 1: Open the Start menu.
Step 2: Open Snip & Sketch.
Step 3: Click on New.
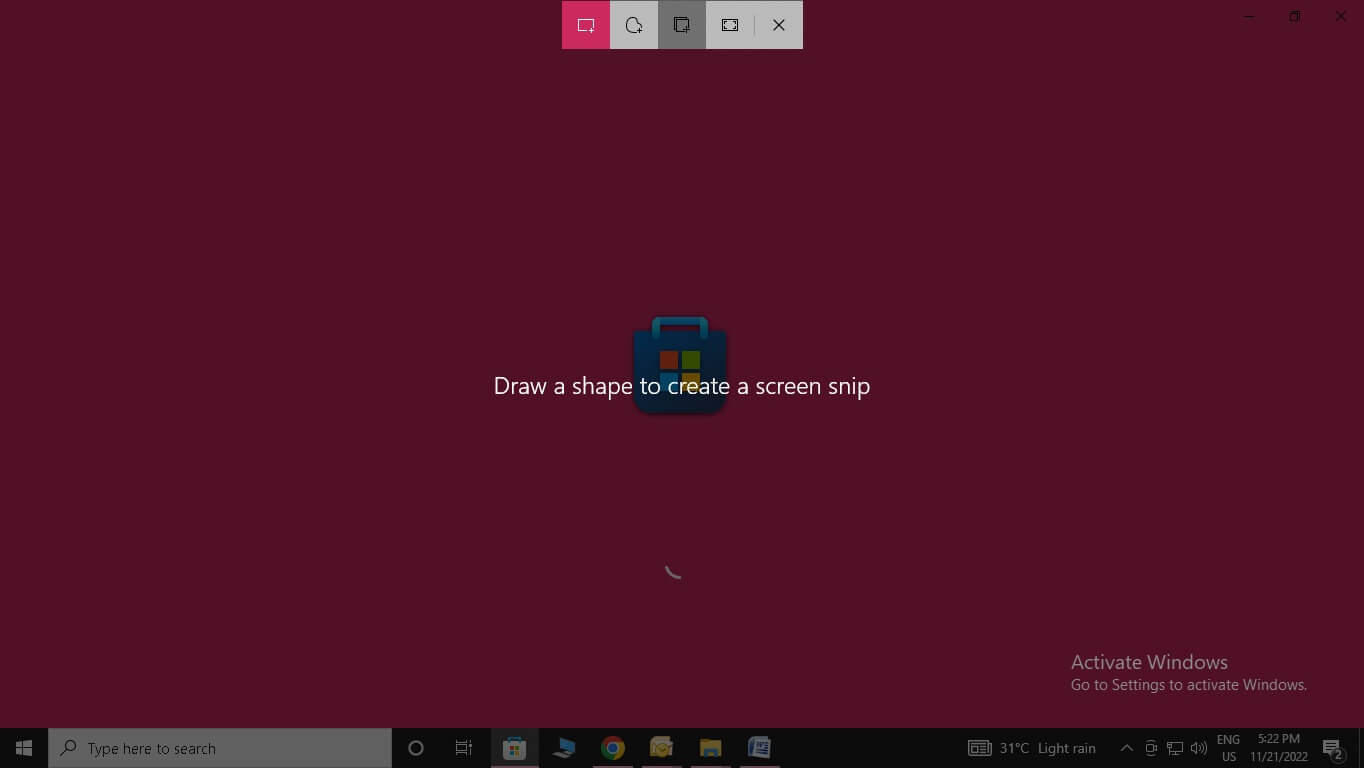
Also, we can use Windows key + Shift + S to take the screenshot on Windows 10.
If you use this app to take screenshots, your screen becomes dim, and the top side menu appears, which gives you many options like rectangular, window, free-form, or full-screen capture. The taken screenshot will be saved to the clipboard, and a preview will display at the bottom right corner of your screen.
These different modes are used to take different screenshots.
Free-form snip: Using the cursor, Draw free-hand.
Rectangular snip: To take rectangular screenshots.
Window snip: Select specific windows.
Full-Screen snip: To take a screenshot of the entire screen.
How to Screenshot on Windows 10 Using Snipping Tool
Windows 10 has a built-in program called SNIPPING TOOL which exists to take screenshots. We will guide you on take Screenshots Windows 10 using the snipping tool.
Step 1: Search the Snipping tool app in the search bar.
Step 2: Open the Snipping tool.
Step 3: Click on Mode to take different screenshots, as mentioned above.
Step 4: Click on Save.
Step 5: Select the location and click on Save.
The snipping tool allows us to take screenshots after a few seconds. This option is mainly used to take screenshots of the pop-up menu.
Step 1: Open the Snipping tool.
Step 2: Click on Delay.
Step 3: Select Seconds.
Step 4: Wait to take the screenshot of your desired piece of screen.
How to Take Screenshots Windows 10 Using Third-Party App
Many third-party applications have different features that are not available in Windows 10 built-in apps. You can use these apps to take screenshots.
Here is the list of third-party applications.
- Snagit
- ShareX
- ScreenPresso
- CloudApp
- PicPick
- Lightshot
- Greenshot
Frequently Asked Questions:
How can Take Screenshot in Laptop?
Press the Windows logo key + PrntScrn key simultaneously. Press the Windows logo key + Volume down button on a tablet simultaneously.
Where are Windows 10 Screenshots Stored?
If you use the Windows logo key + PrntScrn key to take screenshots, Windows 10, by default, saves screenshots in the Picture\Screenshot folder in PNG format.
How do I Enable the Screenshot Button in Windows 10?
Open the Ease of Access in the control panel. Go to the keyboard in the Print Screen shortcut; toggle on the “Use the PrtScn button to access screen snipping”.
And that’s all. Which method do you use to take Windows 10 screenshots? Please tell us in below comment section.
Related: