Last Updated on June 27, 2023 by Bestusefultips
Do you want to delete temporary cache data and files from your Samsung Galaxy? In this tutorial, I’ll show you how to wipe cache partition on Samsung S23 Ultra, S23+, S22 Ultra, and S22 Plus. Wipe cache data doesn’t remove your personal data like a factory reset. Only delete temporary files and improve your phone’s performance to remove unnecessary corrupted data.
Read More: How to Reset Keyboard Settings on Samsung
How to Wipe Cache Partition on Samsung S23 Ultra, S23+, S22 Ultra, S22+
Step 1: Turn Off your Samsung device.
Connect your Samsung phone to your PC using a USB cable.
Step 2: Long-press the power and volume up keys simultaneously until the Android recovery mode screen appears.
Step 3: Press the Volume Down key to highlight the Recovery mode.
Step 4: Press the Volume Down button to highlight the Wipe cache partition.
Step 5: Press the Power key to apply.
Step 6: Use the Volume Down button to select Yes.
Step 7: Press the Power button to apply.
Wait until the clear cache partition is or wipe cache data (unnecessary data and junk files) on your Samsung Galaxy. After restarting your device, you can see the selected reboot system now.
Step 8: Press the Power key to reboot your Samsung phone.
Read Also: How to Extend Battery Life on Samsung
How to Factory Reset Samsung S23 and S22 using Phone Settings
When you factory reset or hard reset your Samsung phone, it will remove all data, including your Samsung account, Google account, pictures, videos, downloaded apps, and more. Back up your essential data before resetting Samsung S23 and S22 devices.
Step 1: Open the app drawer & click on Settings app.
Step 2: Scroll down & click on General Management.
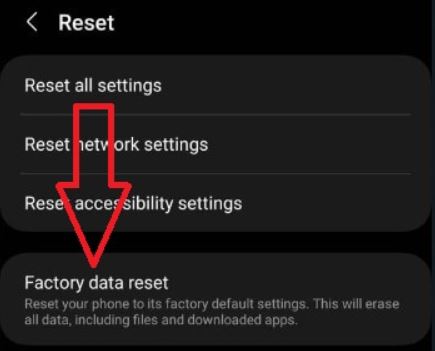
Step 3: Tap on the Reset.
Step 4: Tap the Factory data reset.
Step 5: Tap the Reset.
Step 6: Unlock your Samsung device.
Step 7: Click Delete All.
Wait until the factory resets your phone. It will set factory default settings on your Samsung Galaxy devices.
And that’s it. This clarifies how to wipe cache partitions on Samsung Galaxy devices.
Read More:


