Last Updated on March 7, 2021 by Bestusefultips
Do you want to connect to Wi-Fi on Windows 8 or Windows 10 PC or Laptop? Here’s how to enable WiFi in Windows 10 desktop. Different Windows OS has slightly different settings to turn on WiFi Windows 7/8/10. Several users can’t see Wi-Fi networks on Windows 10, you can check how to find hidden Wi-Fi icon in your PC.
When you have Wi-Fi turned on, your PC automatically connects to nearby Wi-Fi network you’ve connected before. Also set automatically turn on WiFi near saved networks on Windows PC or Laptop. You can enable WiFi in Windows 10 using network and internet settings.
Don’t Miss This:
How to pause updated in Windows 10 up to 35 days
How to turn off auto update in Windows 7
How to set data limit in Windows 10
How to enable WiFi in Windows 10 PC or Laptop
You can manually connect to WiFi Windows 10 laptop using below given complete guide.
Step 1: Tap Windows start
Step 2: Tap Settings gear icon
Step 3: Tap Network & internet
Here you can see Status, Wi-Fi, Ethernet, Dial-up, VPN, Airplane mode, Mobile hotspot, Data usage and proxy settings.
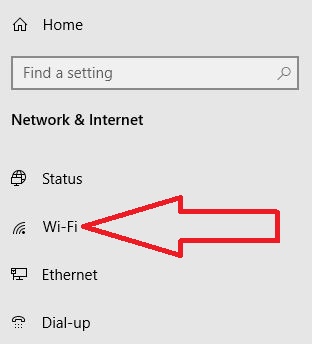
Step 4: Tap Wi-Fi from list
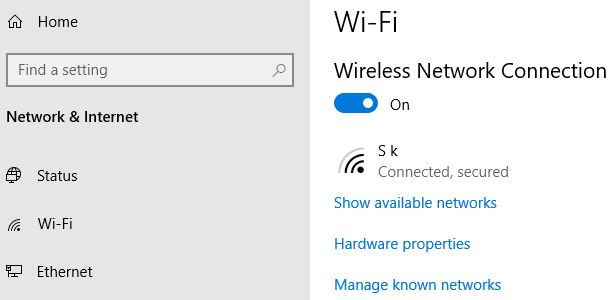
Step 5: Turn on Wireless Network connection
Now enable or disable Wi-Fi on Windows 10 using this setting. If you have already saved nearby network, you’re Windows PC automatically connect with that Wi-Fi network.
Step 6: Tap Show available network to view all Wi-Fi connection nearby you
Step 7: Now select Wi-Fi network from list you want to connect and enter Wi-Fi password if first time connect
It’s quite easy to turn on Wireless capability Windows 10 PC. Also add a new network on Windows 10 using below settings.
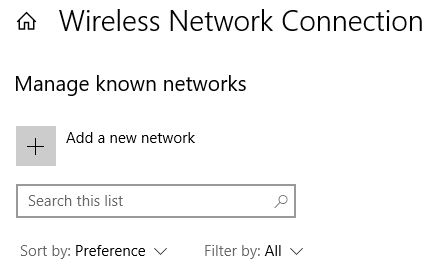
Windows start icon > Settings gear > Network & internet > Wi-Fi > Manage known networks > + Add a new network > Add network name & security type > Save
When you enter Wi-Fi network detail, check the box connect automatically to automatically connect Wi-Fi in Windows 7/8/10 desktop or laptop.
If you’re desktop facing Wi-Fi connectivity issue, make sure updated WiFi driver for Windows 10 or download Wi-Fi driver for Windows 10 free.
How to fix Windows 10 no WiFi option
If you can’t see Wi-Fi network or Wi-Fi icon on Windows 10 Laptop or PC, try below given settings.
Start menu > Settings > Network & internet > Status > Change adapter options > Right click on Wireless adapter > Enable
Remove unwanted Wireless networks on Windows 10
You can delete saved Wi-Fi network on Windows 10 PC or Laptop using below guide.

Start menu > Settings > Network & internet > Wi-Fi > Manage known networks > Select Wi-Fi network from list you want to delete > Forget
And that’s all. We hope above given tutorial useful to enable WiFi in Windows 10 PC or Laptop. Do you still have any question? Tell us in below comment box. Don’t miss out to check our other Windows 10 tips and tricks.