Last Updated on March 7, 2021 by Bestusefultips
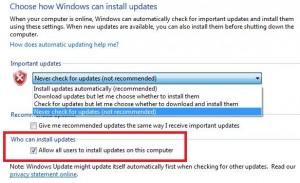
How to turn off auto update in Windows 7 PC. When the internet is turned on in our Windows PC, it can automatically check for Windows updates and install them using your selected Windows Settings options. You have four options to choose Windows update settings including install update automatically, download updates but choose whether to install them, check for system updates but choose whether to download & install them and never check for updates. Choose from the above-given update settings in your Windows 7 or other Windows PC.
Sometimes turn on auto update in Windows PC useful to improved reliability, operating speed, smoothly work, security against unknown spammers, etc. You have also allowed other users to install updates on this Windows computer / PC to tickmark checkbox below update settings option in Windows 7. Follow below-given steps to turn off auto update in Windows 7 / Windows PC.
Check Also:
How to upgrade Windows 7 to Windows 10 Pro free
How to uninstall apps on Windows 10
How to pause update in Windows 10 for 35 days
How to turn on Wi-Fi in Windows 7
How to turn off auto update in Windows 7 or Windows PC
Step 1: Click on the “Start” button on your Windows 7 PC
Step 2: Tap on “Control Panel”
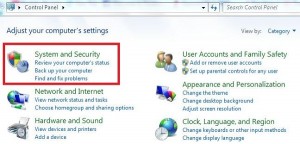
Step 3: Tap on “System and security” category
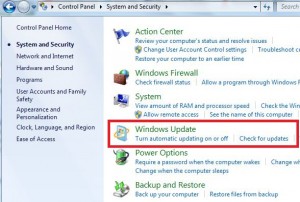
Step 4: Tap on “Windows update”
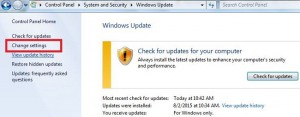
Step 5: Tap on “Change Settings” from the top left side corner sidebar
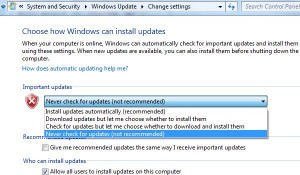
Step 6: You can see the above screen on your Windows 7 / Windows PC. Choose the “Never check for updates” to turn off auto update in Windows 7 /Windows PC
Step 7: Press “OK”
You have also allowed other users to install updates on this Windows computer / PC to tick mark the checkbox of “allow all users to install updates on this computer” under update settings in Windows 7.
Did you find the above process helpful to turn off auto update in Windows 7 or Windows PC? Don’t hesitate to let me know, would be a pleasure to help you.
