Last Updated on November 28, 2022 by Bestusefultips
Taking a screenshot of the screen is incredibly useful for using a Windows 11 System. For taking screenshots of your PC’s screen, Microsoft’s desktop OS has always offered various options. Windows 11, fortunately, makes things easier. We’ll explain the most efficient methods to take screenshot Windows 11. The techniques include trying keyboard shortcuts and more advanced, functional tools that activate you to modify and share screenshots and perform things like set timers for them.
How to Take Screenshot on Windows 11
Check out the below-given methods to take Windows 11 screen shot.
Press the Printscreen (prt sc) Key and Click on Paste to Windows 11 screenshot
You can take a screenshot by long pressing the PrtSc button since much before Windows 11. Some keyboards provide complete print-screen typing. To copy the full desktop image to the clipboard, press this key. The image should be pasted into the Windows 11 application that supports this, such as Paint, Adobe Photoshop, or more.
Click on the Alt key to command Alt-PrtSc if you want to capture the Window of the current program. The current Window is copied to the clipboard when you press these keys together, much like when you capture the entire screen. From there, you can paste it into an imaging application. Since image files are always rectangular, Windows 11 can be odd because the rounded corners are extended to the sum of square corners.
How to Screenshot in Windows 11 Key – PrtSc Keyboard Shortcut
Another technique to utilize the PrtSc key is Activate Windows Key-PrtSc.
You can press the Windows key & the PrtSc key together to capture screenshots and automatically store them somewhere other than OneDrive. This trick quickly shrinks the screen and, by default, creates a PNG file in the Pictures > Screenshots folder. You can paste the image anyplace when you use this trick.
How to Take a Screenshot on Windows 11 using the Snipping Tool
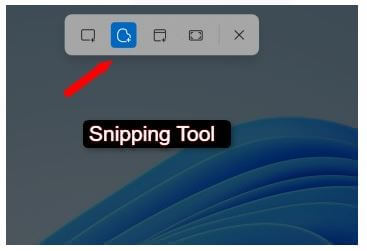
Using the Snipping Tool, you can capture a screenshot of the entire screen, a selected screen, or a separate window. The Snipping Tool can capture anything other than the complete screen. There are four types of capture, specifically rectangle, window, full screen, and interactive elements.
Open the Snipping Tool by pressing Shift + Windows + S on the keyboard to start take screenshot Windows 11. Alternatively, you may open it by typing “snipping tool” into the Start menu’s search box. Then decide on a mode:
Rectangle Snip: Left-click, hover over the target area, and let go of the mouse button.
Do the same as with Rectangle Snip when using Freeform Snip. You can select the capture area in this mode as a freeform shape.
Window Snip: Move the mouse pointer over the chosen window until it is selected, then click left to take a screenshot. The target Window must be in the upper layer. Keep this in mind. If not, others will partially block your captured window.
Full-Screen Snip: A screenshot is immediately taken when you click the Fullscreen Snip button.
The screenshot is then copied to the clipboard, and a thumbnail appears in the screen’s bottom right corner. To access the editing window, click the thumbnail of it. You can make changes to the image here, such as adding lines or underlining text and then save it as a PNG, JPG, or GIF file.
PrintScreen Key for the Snipping Tool
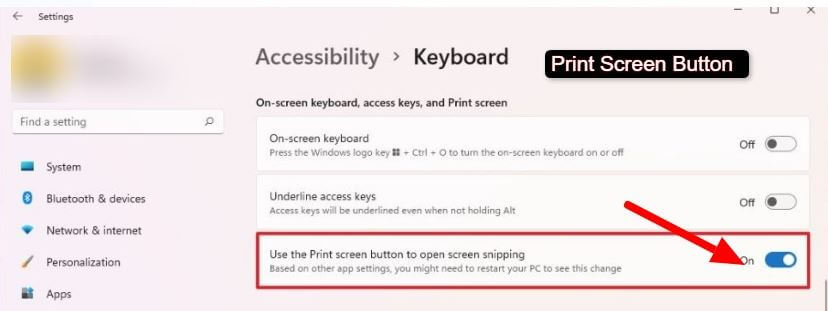
You can also have the PrtSc key open the Snipping Tool when you hit it if you want to avoid dealing with the Shift + Windows logo key + S configuration.
Step 1: By selecting Settings from the Start menu, go to your computer’s settings.
Step 2: Select Keyboard under Accessibility.
Step 3: Search for Toggle screen shipping “on” by opening the Print Screen button and pressing it.
How to Screenshot on Windows Desktop using the Xbox Game Bar
In addition, the Xbox Game Bar was developed to assist gamers in taking screenshots and videos of their games. This makes it an alternative method for taking screenshots and the only built-in way for screen recordings in Windows. By clicking the Windows Key-G key on your keyboard, you can get to it.
Through a variety of various toolbars, the game bar functions. Search for the Capture option. Search for the Capture icon, which resembles a camera, on the main toolbar if you can’t find it.
You may start recording, record the previous 30 seconds, capture a snapshot, and toggle the microphone on or off while recording using the Capture toolbar. Recognize that there are some prohibitions. For instance, File Explorer and the Windows desktop cannot be recorded.
How to Screenshot on a Windows Computer/Laptop using Third Party App
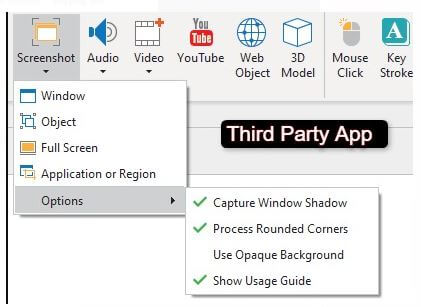
In addition to the built-in features in Windows 11, third-party apps can make it simple for you to take screenshots. We will suggest ActivePresenter take a screenshot on Windows 11. This app’s primary features are screen recording, video editing, and educational authoring, but it also has strong snapshot capabilities. You can use it to capture apps, windows, objects, complete screens, or regions.
Step 1: Click on Insert Tab after that Screenshot.
Step 2: Select one option from three options: Window, Object, or Full Screen.
Step 3: Take the Cursor to the targeted area.
Step 4: Hold the CTRL key and the left key.
Step 5: Click Print Screen to take a screenshot.
The take screenshot Window will display if you choose the Application or Region mode, allowing you to change several screenshot characteristics.
Additionally, you can modify several settings before capture. For instance, showing snapshot guides or capturing the drop-shadow around an application window’s border.
The image that was taken is added to a slide by ActivePresenter. To edit it, right-click it and choose “Edit Image.” You can, for instance, Windows screenshot crop, scale, rotate, add blur effects, and do many other things with it. The snapshot can be saved as a PNG, JPG, or BMP file by selecting right-click > Export To File when you are happy.
Please find this helpful tutorial to take screenshot on Windows 11. If you like Windows 11 tricks, please share them with your friends and stay updated on the latest. We will also consider if you have other ways you can quickly mention in the comment section.
Related: