Last Updated on March 7, 2021 by Bestusefultips
Here’s how to set or change the account name Windows 10/8/7. It’s quite easy to change or remove the account name or type on your Windows 7 desktop or laptop. Change or new account name will appear on the windows screen when starting and on the start menu. You can also add or remove the account, change the account type, and account picture using the user account setting.
Also, rename the existing user account name using mange user accounts settings on your Windows 7 desktop or laptop. Follow the below-given steps to change the account name Windows 7/8/10 device.
Read Also:
- How to switch account on Facebook messenger on Android
- How to check for Windows 10 update
- How to change Windows 7 Password
- How to turn off auto-update in Windows 7 / 8 / 10
How To Change User Account Name Windows 10/Windows 8,8.1/ Windows 7
This tutorial explains you steps to rename user accounts on a Windows 10, 8.1, 8, and 7.
Change Username on Windows 10: Local user
Step 1: In the taskbar search box, search for Control panel and tap Control panel when available.
Step 2: Tap User accounts.
Step 3: Tap Change your account name.
Step 4: Enter the name of the user account you want to set.
Step 5: Tap Change the name.
Change Your Computer Name in Windows 7
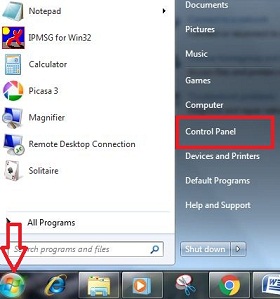
Step 1: Click the “Windows start menu” icon and tap on “Control panel”.
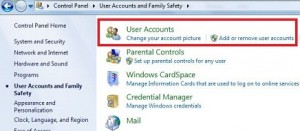
Step 2: Tap on the “User accounts and family safety” category.
Step 3: Click on “User accounts”.
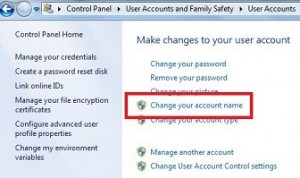
Step 4: Tap on “Change your account name”.
Step 5: Enter a new account name on the box.
This new account name will appear on the welcome screen and on the start menu.
Step 6: Click on the “Change Name” button.
Relevant:
- How to remove windows 10 sign in pin
- How to change administrator password in Windows 10
- How to change your Windows 10 user picture
- How to set up a Picture Password in Windows 10
Quickly Change Account Name In Windows 7 PC
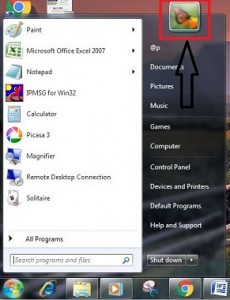
Step 1: Click on the “Windows start menu” icon.
Step 2: Tap on “account picture” from the top of the above.
You can see the above screen on your device
Step 3: Tap on “Change your account name”.
Step 4: Enter the new user account name and tap Change name.
There are very useful short cut tricks to change or remove account name on Windows 7 within a few minutes.
Change User Profile in Windows 7
Windows Start button > Profile icon > Change your picture > Choose a new picture from default photos or browse to you PC > Select picture > Change picture
Above you can see the process to change account name Windows 7/Windows 8/Windows 10. If you have any concerns or questions regarding the above-given steps feel free to let us know via below comment box. It would be a pleasure to help you.
