Last Updated on April 18, 2023 by Bestusefultips
Are you annoyed by an Android phone connected to WiFi but no internet issues? This connected to device can’t provide internet issue occurs due to router problems, IP configuration issues, ensure that you turn off VPN or check if a firmware update is available. In this tutorial, I’ll show your possible solutions to fix a phone connected to WiFi no internet on Android, Google Pixel, Samsung Galaxy, OnePlus, and other devices.
Read More: How to Set up a Static IP Address on Android, iPhone, Windows 11/10, Mac, Raspberry PI
How to Fix Connected to WiFi No Internet on Android: Google Pixel, Samsung, OnePlus
Check out the below-given troubleshooting methods to fix the WiFi connection but no internet on Android phones and tablets.
Restart your Phone
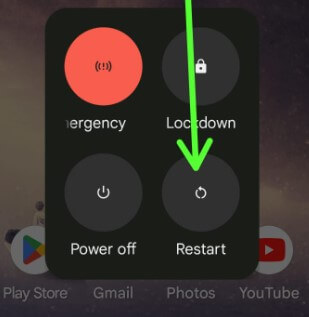
Restarting your phone sometimes fixes minor connectivity bugs. Long-press the power button and tap Restart in the power menu to restart your Android phone.
Samsung Galaxy: Long-press the power button > Restart > Restart.
Restart your Router
If you’re using a WiFi network on your Android phone using a router, switch off your router for 5-10 seconds and switch it on and try to connect to the WiFi network.
Connect your WiFi to another Phone to check if the Wi-Fi network or Phone Issues
Try to connect your WiFi to another phone or tablet. If the internet is accessed on another device, the problem is with your phone.
Turn Off Airplane Mode
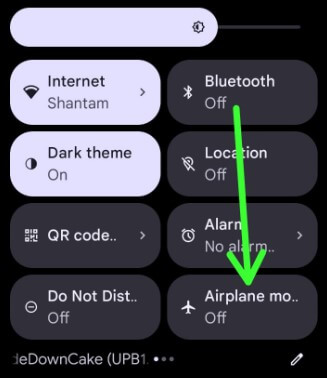
Ensure airplane mode is turned off on your phone. Swipe down the notification panel at the top and tap on Airplane mode to turn it on/off. If you turn on airplane mode, all connectivity settings are disabled.
Check for System Update
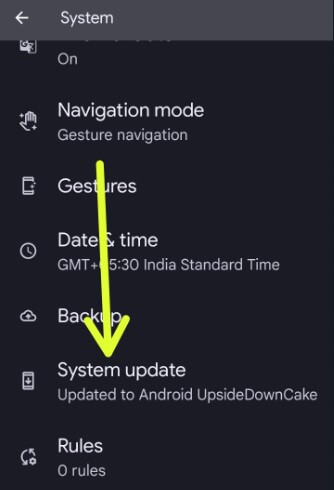
Check if any software update is available on your phone. To check the system update, go to Settings > System > System update > Check for update.
Samsung Galaxy: Settings > Software update > Download and install.
Forget the WiFi Network & Reconnect
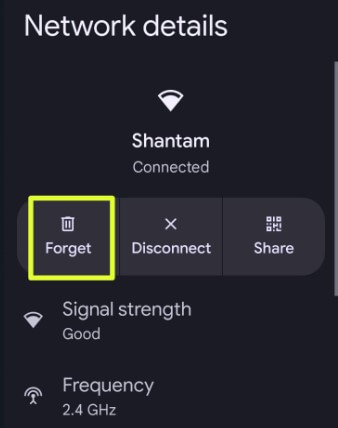
Delete the connected WiFi network and reconnect it. To delete the WiFi network, go to Settings > Network & Internet > Wi-Fi > Settings gear icon of connected WiFi network > Forget.
Samsung Galaxy: Settings > Connections > WiFi > Settings gear icon of connected network > Forget at the bottom right corner > Delete.
Restart your phone and try to connect wifi network again to fix the Android phone connected to wifi but no internet access.
Reset the Router
Reset your router to set default settings and turn it on and try to connect your phone to WiFi.
Turn Off VPN
Ensure to turn off VPN on your device. Disable VPN and check if fix the WiFi connected no internet problem.
Ensure to Set IP Settings as DHCP
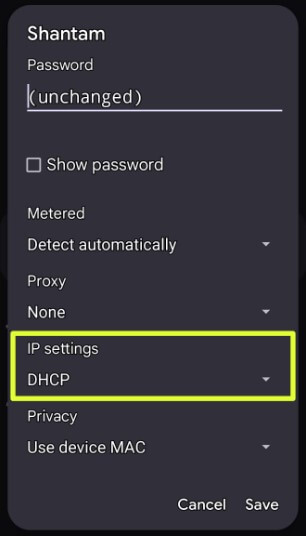
Make sure the IP configuration is set as DHCP on your Android device. To check IP settings, go to Settings > Network & Internet> Wi-Fi > Settings gear icon of Connected WiFi network > Pencil icon at the top right corner > Advanced options > IP Settings > DHCP > Save.
Use a Private DNS Server
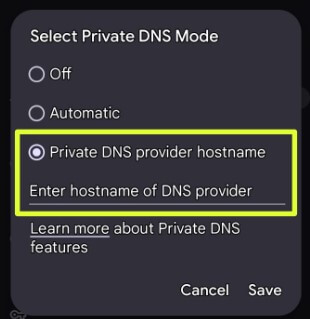
Set a private DNS on your device if default DNS settings cause the no internet connection problem on your device. To Set a private DNS, go to Settings > Network & Interent> Private DNS > Private DNS provider hostname > Enter the hostname of DNS provider > Save. Now, check to fix the WiFi connected but no internet issue on your phone.
Samsung Galaxy: Settings > Connections > More connection settings > Private DNS > Private DNS provider hostname > Enter the DNS hostname > Save.
Reset Network Settings
Resetting the network settings will delete your phone’s saved WiFi networks, Bluetooth connections, and other cellular data settings. To Reset network settings on your Android, go to Settings > System > Reset options > Reset WiFi, Bluetooth & Mobile data settings > Reset settings > Reset settings.
Samsung Galaxy: Settings > General management > Reset > Reset WiFi, Bluetooth & Mobile data > Reset settings > Reset.
Contact your Internet Service Provider
If none of the above-given methods worked for you, you need to perform a factory reset on your Android device. It will remove all your phone data and back up important data before factory resetting your Android phone.
That’s all. I hope the above-given tricks will help you to fix the problem of WiFi connected but not working on Internet Android phones. If you have any concerns regarding the above methods, please share them in the comment box below.
Read More:
- How to Fix No LTE Connection after Update my Samsung Galaxy
- How to Turn On Mobile Hotspot in Windows 10
- How to Fix Not Register on Network Error on Samsung Galaxy
FAQs:
Why does my WiFi say no internet?
There are several reasons for your WiFi says there is no internet, including a router or modem problems, check the network settings you entered, many devices connected to your Wifi network, check the router or modem firmware update, DNS problem, blocking the internet if using antivirus or security software, or Internet service provider problem.
How do I Fix no internet access?
If you’re facing a no internet access problem, check the network cable is connected correctly. Other solutions are checking your WiFi connection, restarting your router or modem, turning off the firewall, or checking for malware. If none of the solutions work, contact your internet service provider (ISP).