Last Updated on March 7, 2021 by Bestusefultips
Want to set scheduled software updates on Galaxy Note 9? You can set Samsung update software using software updates settings. By default disable software updates on your Samsung Note 9. Also, download the update manually in your Samsung galaxy devices. After set scheduled software updates time in your Note 9, your software update will be automatically installed at the time you set.
Also, last update information in your android device. Follow the below-given step by step process to enable scheduled software updates on Galaxy Note 9.
Read Also:
- How to enable Scene optimizer on Galaxy Note 9
- How to change lock screen shortcuts on Galaxy Note 8
- How to take a picture using S Pen on Galaxy Note 9
- How to auto-download software on Galaxy S10 Plus, S10, and S10e
- How to change screen resolution on Samsung Note 9
How to Check Samsung Note 9 Software Update

By default manually Samsung updates the software on your Note 9 and other devices. Let see settings to set time for automatically check for update and install it when available.
Step 1: Swipe down the notification panel and tap the Settings gear icon.
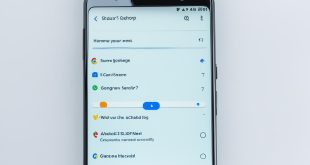
Step 2: Scroll down and tap Software update.
Here you can see download updates manually, scheduled software updates, and last update information options. By default turned off scheduled software update.
Step 3: Toggle on Scheduled software update.
Step 4: Now, set the time you want to automatically check for updates.
If a system software update is available on your Samsung Galaxy Note 9, it will be installed automatically at the time you set on your phone.
Step 5: Tap Download updates manually to manually check Samsung software update available or not.
If possible then make sure to update system software on galaxy Note 9 using Wi-Fi to avoid interruption while downloading updates.
How to Change Device Name on Galaxy Note 9
By default, your device name set as Galaxy Note 9 (Your Phone name).
Step 1: Swipe down the notification shade and tap the Settings gear icon.
Step 2: Tap About phone at end of the page.
Here you can see SIM card status, IMEI number, software information about installed version, build number, battery status, and other details.
Step 3: Tap Edit.
Step 4: Now enter the name you want to set as Note 9 device name.
Step 5: Tap Done.
Now, change your Samsung Note 9 name.
And that’s it. I hope this simple tutorial helpful to set scheduled software updates on Galaxy Note 9. If you have any questions, tell us in below comment box. Stay and connect with us for the latest updates.